Unityで脱出ゲームの作り方(8)「アイテムを選択(装備)する」
2015/08/02
アイテムリストクリックでアイテムを装備する
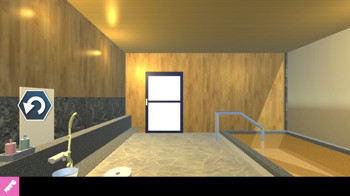
アイテムリストのカギをクリックしたら選択状態がわかるように、ピンク色を付けてみましょう。(画像左下)
- GameObject > 3D Object > Planeで平面を新規作成します。
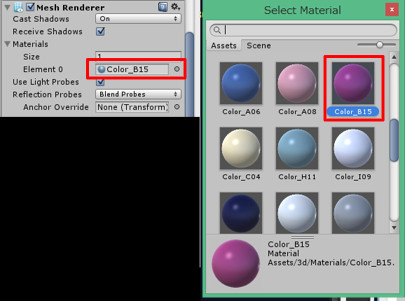
- 平面にわかりやすいように色を付けます。
インスペクターのMesh Renderrerの「Element 0」 のマテリアルを選択します。
ここではピンクにしました。
- レイヤーをitemListにし、カギの裏側に来るように移動・回転します。
ゲーム画面で見た時に綺麗に重なっているように見えればOKです。
カメラの奥行きをOFFにしたので、縦と横さえ合っていれば奥行きはどこにおいてもOKです
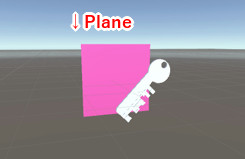
見た目はできたのであとはこれをクリックでON/OFF切りかえすればOKですね。
ピンクのPlaneにおなじみBox Colliderを付けておき、名前を「itemBtn_key_plane」にします。
using UnityEngine;
using UnityEngine.UI;
using UnityEngine.EventSystems;
using System;
using System.Collections;

public class GameSystem : MonoBehaviour {

	public GameObject mainCamera; //カメラの定義
	public EventSystem eventsystem; //イベントシステム(いろんなことに使う)の定義

	//クリックでレイ(光線)とばす
	public Ray ray;
	public Ray rayItem;
	public RaycastHit hit;
	public GameObject selectedGameObject;

	//アイテム
	public GameObject item_key;


	/*------------
	管理
	------------*/
	public string standName; //現在の立ち位置
	public string myItem;

	// アイテムボタン
	public GameObject itemBtn_key;

	// Use this for initialization
	void Start () {
		standName = "centerN"; //現在の立ち位置 = 北向き
		eventsystem = GameObject.Find("EventSystem").GetComponent<EventSystem>();
		item_key = GameObject.Find("key");

		GameObject.Find("itemBtn_key_plane").GetComponent<Renderer>().enabled = false;
		itemBtn_key = GameObject.Find("itemBtn_key");
		itemBtn_key.SetActive(false);
		myItem = "noitem";
	}

	// Update is called once per frame
	void Update () {
		/*--------------
		画面クリック処理
		--------------*/
		if(Input.GetMouseButtonUp(0)){ //左クリック
			if(eventsystem.currentSelectedGameObject==null){// UI以外(3D)をさわった
				searchRoom(); //3Dオブジェクトをクリックした時の処理
			}else{ // UIをさわった
				switch(eventsystem.currentSelectedGameObject.name){
					case "turnLBtn":
						turnL();
						break;
				}
			}
		}
	}

	public void turnL () {
		switch(standName){
			case "centerN":
				iTween.RotateTo(GameObject.Find("mainCamera"),iTween.Hash(
					"x",0, "y",270, "z",0, "time", 0.4, "islocal", true
				));
				iTween.MoveTo(GameObject.Find("mainCamera"),iTween.Hash(
					"x",-1, "y",7, "z",-20, "time", 0.4, "islocal", true
				));
				standName = "centerW";
				break;
			case "centerW":
				iTween.RotateTo(GameObject.Find("mainCamera"),iTween.Hash(
					"x",0, "y",180, "z",0, "time", 0.4, "islocal", true
				));
				iTween.MoveTo(GameObject.Find("mainCamera"),iTween.Hash(
					"x",-1, "y",7, "z",-20, "time", 0.4, "islocal", true
				));
				standName = "centerS";
				break;
			case "centerS":
				iTween.RotateTo(GameObject.Find("mainCamera"),iTween.Hash(
					"x",0, "y",90, "z",0, "time", 0.4, "islocal", true
				));
				iTween.MoveTo(GameObject.Find("mainCamera"),iTween.Hash(
					"x",-5, "y",7, "z",-20, "time", 0.4, "islocal", true
				));
				standName = "centerE";
				break;
			case "centerE":
				iTween.RotateTo(GameObject.Find("mainCamera"),iTween.Hash(
					"x",0, "y",0, "z",0, "time", 0.4, "islocal", true
				));
				iTween.MoveTo(GameObject.Find("mainCamera"),iTween.Hash(
					"x",-6, "y",7, "z",-26, "time", 0.4, "islocal", true
				));
				standName = "centerN";
				break;
		}
	}
	public void searchRoom(){
		selectedGameObject=null;
		ray = Camera.main.ScreenPointToRay(Input.mousePosition);
		if (Physics.Raycast(ray, out hit, 10000000,1 << 8)) {
			selectedGameObject = hit.collider.gameObject;
			switch(selectedGameObject.name){
				case "redSwitch":
					iTween.MoveTo(item_key,iTween.Hash(
						"z",0.6, "time", 0.2, "islocal", true, "easeType", iTween.EaseType.linear
					));
					break;
				case "key":
					item_key.SetActive(false);
					itemBtn_key.SetActive(true);
					break;
			}
		}
		rayItem = GameObject.Find ("itemListCamera").GetComponent<Camera> ().ScreenPointToRay(Input.mousePosition);
		if (Physics.Raycast(rayItem, out hit, 10000000,1 << 9)) {
			selectedGameObject = hit.collider.gameObject;
			switch(selectedGameObject.name){
				case "itemBtn_key_plane":
					if(myItem == "key"){
						GameObject.Find("itemBtn_key_plane").GetComponent<Renderer>().enabled = false;
						myItem="noitem";
					}else{
						GameObject.Find("itemBtn_key_plane").GetComponent<Renderer>().enabled = true;
						myItem="key";
					}
					break;
			}
		}
	}
}
ピンクの平面はゲーム開始時にGetComponent().enabled = falseで非表示にします。setActiveとはまた別の表示/非表示方法です。
GameObject.Find("itemBtn_key_plane").GetComponent<Renderer>().enabled = false;
rayを飛ばす処理が2つになります。コピペしてところどころいじります。
itemListはレイヤー9なので以下の数字は9になります。
if (Physics.Raycast(rayItem, out hit, 10000000,1 << 9)) {
今装備中のアイテムはmyItemで管理します。
if文でmyItem == “key”(=カギ装備中)ならアイテム装備をはずし、そうでなければ(=装備していなければ)カギを装備します。
if(myItem == "key"){
	GameObject.Find("itemBtn_key_plane").GetComponent<Renderer>().enabled = false;
	myItem="noitem";
}else{
	GameObject.Find("itemBtn_key_plane").GetComponent<Renderer>().enabled = true;
	myItem="key";
}
鍵を使ってドアを開ける
ここまでくればあとはおさらいですね。
3Dのドアを選択してdoorという名前にし、レイヤーをclickableにします。
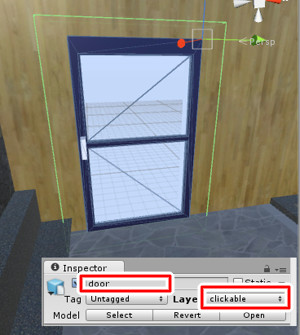
そして以前やったカギが降ってくる動作と同様にして、ドアが開く処理を書けばOK!
switch(selectedGameObject.name){
	case "redSwitch":
		iTween.MoveTo(item_key,iTween.Hash(
			"z",0.6, "time", 0.2, "islocal", true, "easeType", iTween.EaseType.linear
		));
		break;
	case "key":
		item_key.SetActive(false);
		itemBtn_key.SetActive(true);
		break;
	case "door":
		if(myItem == "key"){
			iTween.MoveTo(GameObject.Find("door"),iTween.Hash(
				"x",-40, "time", 0.4, "islocal", true
			));
		}
		break;
}
ドアを開けばクリアとなりますので
これまででで脱出ゲーム基本の基本はできるようになりました(はず…)。
次回からは演出の強化、アイテムの拡大表示などのブラッシュアップをしていきます。
ここまでの全ソースコード↓
using UnityEngine;
using UnityEngine.UI;
using UnityEngine.EventSystems;
using System;
using System.Collections;

public class GameSystem : MonoBehaviour {

	public GameObject mainCamera; //カメラの定義
	public EventSystem eventsystem; //イベントシステム(いろんなことに使う)の定義

	//クリックでレイ(光線)とばす
	public Ray ray;
	public Ray rayItem;
	public RaycastHit hit;
	public GameObject selectedGameObject;

	//アイテム
	public GameObject item_key;


	/*------------
	管理
	------------*/
	public string standName; //現在の立ち位置
	public string myItem;

	// アイテムボタン
	public GameObject itemBtn_key;

	// Use this for initialization
	void Start () {
		standName = "centerN"; //現在の立ち位置 = 北向き
		eventsystem = GameObject.Find("EventSystem").GetComponent<EventSystem>();
		item_key = GameObject.Find("key");

		GameObject.Find("itemBtn_key_plane").GetComponent<Renderer>().enabled = false;
		itemBtn_key = GameObject.Find("itemBtn_key");
		itemBtn_key.SetActive(false);
		myItem = "noitem";
	}

	// Update is called once per frame
	void Update () {
		/*--------------
		画面クリック処理
		--------------*/
		if(Input.GetMouseButtonUp(0)){ //左クリック
			if(eventsystem.currentSelectedGameObject==null){// UI以外(3D)をさわった
				searchRoom(); //3Dオブジェクトをクリックした時の処理
			}else{ // UIをさわった
				switch(eventsystem.currentSelectedGameObject.name){
					case "turnLBtn":
						turnL();
						break;
				}
			}
		}
	}

	public void turnL () {
		switch(standName){
			case "centerN":
				iTween.RotateTo(GameObject.Find("mainCamera"),iTween.Hash(
					"x",0, "y",270, "z",0, "time", 0.4, "islocal", true
				));
				iTween.MoveTo(GameObject.Find("mainCamera"),iTween.Hash(
					"x",-1, "y",7, "z",-20, "time", 0.4, "islocal", true
				));
				standName = "centerW";
				break;
			case "centerW":
				iTween.RotateTo(GameObject.Find("mainCamera"),iTween.Hash(
					"x",0, "y",180, "z",0, "time", 0.4, "islocal", true
				));
				iTween.MoveTo(GameObject.Find("mainCamera"),iTween.Hash(
					"x",-1, "y",7, "z",-20, "time", 0.4, "islocal", true
				));
				standName = "centerS";
				break;
			case "centerS":
				iTween.RotateTo(GameObject.Find("mainCamera"),iTween.Hash(
					"x",0, "y",90, "z",0, "time", 0.4, "islocal", true
				));
				iTween.MoveTo(GameObject.Find("mainCamera"),iTween.Hash(
					"x",-5, "y",7, "z",-20, "time", 0.4, "islocal", true
				));
				standName = "centerE";
				break;
			case "centerE":
				iTween.RotateTo(GameObject.Find("mainCamera"),iTween.Hash(
					"x",0, "y",0, "z",0, "time", 0.4, "islocal", true
				));
				iTween.MoveTo(GameObject.Find("mainCamera"),iTween.Hash(
					"x",-6, "y",7, "z",-26, "time", 0.4, "islocal", true
				));
				standName = "centerN";
				break;
		}
	}
	public void searchRoom(){
		selectedGameObject=null;
		ray = Camera.main.ScreenPointToRay(Input.mousePosition);
		if (Physics.Raycast(ray, out hit, 10000000,1 << 8)) {
			selectedGameObject = hit.collider.gameObject;
			switch(selectedGameObject.name){
				case "redSwitch":
					iTween.MoveTo(item_key,iTween.Hash(
						"z",0.6, "time", 0.2, "islocal", true, "easeType", iTween.EaseType.linear
					));
					break;
				case "key":
					item_key.SetActive(false);
					itemBtn_key.SetActive(true);
					break;
				case "door":
					if(myItem == "key"){
						iTween.MoveTo(GameObject.Find("door"),iTween.Hash(
							"x",-40, "time", 0.4, "islocal", true
						));
					}
					break;
			}
		}
		rayItem = GameObject.Find ("itemListCamera").GetComponent<Camera> ().ScreenPointToRay(Input.mousePosition);
		if (Physics.Raycast(rayItem, out hit, 10000000,1 << 9)) {
			selectedGameObject = hit.collider.gameObject;
			switch(selectedGameObject.name){
				case "itemBtn_key_plane":
					if(myItem == "key"){
						GameObject.Find("itemBtn_key_plane").GetComponent<Renderer>().enabled = false;
						myItem="noitem";
					}else{
						GameObject.Find("itemBtn_key_plane").GetComponent<Renderer>().enabled = true;
						myItem="key";
					}
					break;
			}
		}
	}
}
関連記事
-
-
Unityで脱出ゲームの作り方(3)「部屋の中を移動する・下準備編」
このパートでは脱出ゲーム定番の移動ボタンを追加します。 画面上に固定で表示するU …
-
-
Unityで脱出ゲームの作り方(5)「3Dオブジェクトをクリックで取得」
これまでのパートでUIボタンのクリックはできました。 このパートでは上の画像の、 …
-
-
Unityで脱出ゲームの作り方(2)「UnityにSketchupの3Dの部屋をインポート」
第2回からはUnityという今話題のゲーム作成ソフトを使っていきます。 とても高 …
-

-
Unityで脱出ゲームの作り方(6)「物体を滑らかにアニメーションで動かす」
第6回は物体のなめらかなアニメーション(トゥイーン)を実装します。 脱出ゲームに …
-
-
Unityで脱出ゲームの作り方(1)「3Dの部屋を作る」
Unityで脱出ゲーム講座 初回は3Dの部屋づくりからはじめます。 このパートで …
-
-
Unityで脱出ゲームの作り方(7)「アイテムリストを作る」
前回まででスイッチを押すとカギが降ってくるようにしました。 ここで落ちてきたカギ …
-

-
Unityで脱出ゲームの作り方(4)「部屋の中を移動する・UIでカメラ回転編」
第4回はカメラ回転のスクリプトを実際に書いていきます。 上の画像のようにぐるりと …
Comment
何も知らないぺーぺーの状態だったのですが、こちらを読んで制作の大体の流れがわかるようになりました。
すごく助かりました。ありがとうございます。
[…] https://senkouemaki.com/lab/?p=144 […]
続きも頼みますよォ!!